Static Page Protocol: Difference between revisions
(→Lists) |
|||
| Line 307: | Line 307: | ||
#To view your changes on http://genecats.cse.ucsc.edu/, type '''make install''' on hgwdev in $HOME/genecats. | #To view your changes on http://genecats.cse.ucsc.edu/, type '''make install''' on hgwdev in $HOME/genecats. | ||
# If your changes look good, check them in. | # If your changes look good, check them in. | ||
==Editing sla.html== | ==Editing sla.html== | ||
Revision as of 22:16, 25 July 2017
Template for new static pages
If you need to create a new static page, please see ~/kent/src/hg/htdocs/template.html dev link. This page contains nearly all of the html elements you will need to create or update pages on the Genome Browser website.
You may also want to look at gbStatic.css to see how things are defined. If you think you need a new element, don’t just add it inline — please ask to get it styled. Note that you must push changes to gbStatic.css, just like static docs. gbStatic.css lives at /usr/local/apache/htdocs/staticStyle/ and is used only by static pages, so changes are not tied to releases.
You may also wish to review the Static Doc Overview Presentation by Kate and Donna.
General style recommendations
Capitalization:
- Use only lower case for HTML element names, attributes and values, e.g. <a>...</a> versus upper-case <A>...</A>
- For header lines only capitalize the first letter of the first word and any words that are proper nouns, everything else should be in lower case. (i.e., Custom track guidelines section, NOT Custom Track Guidelines Section)
Quotes: Use double quotes for attribute values. Ex: target="_blank" versus bad (but working) html without quotes: target=_blank
Whitespace: Use a new line for every block list or table element
Indentation: Indent every child element 2 spaces.
Line length: Limit lines to a maximum of 100 characters to comply kent source style guidelines.
Special characters: Don't use entity references (set editor to UTF-8), except < &. Examples of special characters that occur in the text on our html pages include:
- double quote ("):
" - ampersand (&):
& - less than (<):
< - greater than (>):
> - degree (°):
°
Page layout
The header and footer for the page are set up through the inclusion of standard header (inc/gbPageStart.html) and footer (inc/gbPageEnd.html) files. With a few rare exceptions, these should always be used rather than hardcoding the header/footer information. The example below shows the basic setup of the header and footer for our static pages. When creating a new page, be sure to copy this text from the static page template in the kent source tree (~/kent/src/hg/htdocs/template.html), rather than from this wiki example.
Customize these header settings on your new page:
- TITLE: Replace "Page Title" with a short title for your page, e.g. "UCSC Genome Browser Contacts".
- ROOT: Replace "." with the position of this page in the document hierarchy relative to the root. It is used to set up relative paths.
- DYNAMIC: Include this line if the page contains collapsible lists; need not be included otherwise.
<!DOCTYPE html>
<!-- Page header -->
<!--#set var="TITLE" value="Page Title" -->
<!--#set var="ROOT" value="." -->

<!-- The following setting enables collapsible lists -->
<!--#set var="DYNAMIC" value="TRUE" -->

<!-- Relative paths to support mirror sites with non-standard GB docs install -->
<!--#include virtual="$ROOT/inc/gbPageStart.html" -->

<!-- Page content -->
<h1>My Page</h1>
<p>
Sample Intro</p>

<h2>Topic</h2>
<p>
Sample Paragraph</p>
<p>

<h3>Sub header</h3>
<p>
Sample Paragraph</p>

<h6>Titled Paragraph</h6>
<p>
Sample Paragraph</p>

<!--#include virtual="$ROOT/inc/gbPageEnd.html" -->
Headings
The following heading levels are currently styled (see example in header/footer section for syntax). If you require a modification for a special circumstance, ask to have it styled in the .css file rather than hardcoding the style elements inline.
- h1: Main title of the page. Should appear first in the file after the header information. Include only one instance per page.
- h2: Headings for major topic sections within a page.
- h3: Headings for subsections within a topic section. Should be nested within an h2 heading.
- h6: Heading for a "titled paragraph". It displays the title text in bold, followed by the paragraph text. It can be used at any level within the section hierarchy.
Lists
The examples below show the html conventions for the types of lists commonly used on our static pages. See the ~/kent/src/hg/htdocs/template.html page to view additional examples and to copy/paste text.
Numbered list
Use for a list of elements in which numbering or ordering is meaningful, e.g. steps in a procedure that must be followed in a certain order.
<!-- Numbered list example -->
  <ol>
    <li>First, do this.</li>
    <li>Then, do this.</li>
    <li>Finally, do this.</li>
  </ol>
Bulleted list
Use for a list of elements in which a numerical order is unnecessary, e.g. a list of organisms.
<!-- Bulleted list example -->
  <ul>
    <li>human</li>
    <li>mouse</li>
    <li>rat</li>
  </ul>
To suppress the display of bullets in the ul list, add the list class "gbsNoBullet":
<ul class="gbsNoBullet">
Definition list
Use this format when defining terms or phrases. Each term (designated by the dt tag) is displayed in bold, followed by the definition (designated by the dd tag) displayed on a separate line. Note that this form of display is often styled ad-hoc on older browser pages using the strong and br tags.
<!-- Definition lists -->
  <dl>
    <dt>First term</dt>
      <dd>Definition</dd>
    <dt>Second term</dt>
      <dd>Definition</dd>
  </dl>
Collapsible list
This format is useful when you need to display lists containing many elements that might clutter the display and hinder navigation. The user is able to expand/collapse each list, focusing on items of interest. The index at the top of the browser credits page is an implemented example of a collapsible list.
To enable collapsible lists on a page, be sure to set the variable DYNAMIC to "true" in the page header (see the example in the Header and footer includes section):
<!--#set var="DYNAMIC" value="TRUE" -->
The example below demonstrates the setup for 2 collapsible lists named Mammals and Insects. By default, the Mammals list is initially displayed in collapsed form with only the list title visible. The Insects list is initially displayed in expanded form, showing all of its elements.
<p class="collapse-section">
  <!-- Set list title to Mammals and display as collapsed by default -->
  <a class="collapsed collapse-toggle" data-toggle="collapse" href="#mammals">Mammals</a>
  <div class="collapse" id="mammals">
    <ul>
      <li><a href="#human">Human genome</a></li>
      <li><a href="#mouse">Mouse genome</a></li>
      <li><a href="#rat">Rat genome</a></li>
    </ul>
  </div>
</p>

<p class="collapse-section">
  <!-- Set list title to Insects and display as expanded by default -->
  <a class="collapse-toggle" data-toggle="collapse" href=#bugs>Insects</a>
  <div class="collapse in" id="bugs">
    <ul>
      <li><a href="fly">Fly genome</a></li>
      <li><a href="bee">Bee genome</a></li>
    </ul>
  </div>
</p>
In the Mammals list, the default display is set to collapsed by setting the a class to "collapsed collapse-toggle" and the div class to "collapse". The href attribute "#mammals" must match the id attribute "mammals" for the list to collapse and expand correctly.
Similarly, in the Insects list, the default display is set to expanded by setting the a class to "collapse-toggle" and the div class to "collapse in".
To make text bold and red colored use "gbsWarnText".
Tables
This example shows the html text for a basic table. See the ~/kent/src/hg/htdocs/template.html page to view additional examples and to copy/paste text.
<table>
  <tr>
    <th>Type</th>
    <th>Total</th>
  </tr>
  <tr>
    <td>Chromosomes</td>
    <td>261</td>
  </tr>
  <tr>
    <td>Haplotypes</td>
    <td>261</td>
  </tr>
  <tr>
    <td>Unlocalized contigs</td>
    <td>1270</td>
  </tr>
</table>
To display the table without a border, use the table class "gbsNoBorder":
<table class="gbsNoBorder">
To horizontally center the text within all table cells, add the table class "gbsCenterText":
<table class="gbsCenterText">
To horizontally center the text within selected cells, add the td class "text-center":
<td class='text-center'>1</td>
Pictures
Look to ~/kent/src/hg/htdocs/template.html as your starter page and to see examples, but here is an example of an inline image:
<p> Look at this wrench <img class="gbsInlineImg" src="images/wrench.png">!</p>
And here is an example of a centered picture with a caption for reference:
<p class='text-center'>
  <img class='text-center' src="images/gbstaff16.jpg" alt="Genome Browser staff" width="499" height="299">
  <p class='gbsCaption text-center'>Browser staff in native habitat.</p>
</p>
Multiple column layout
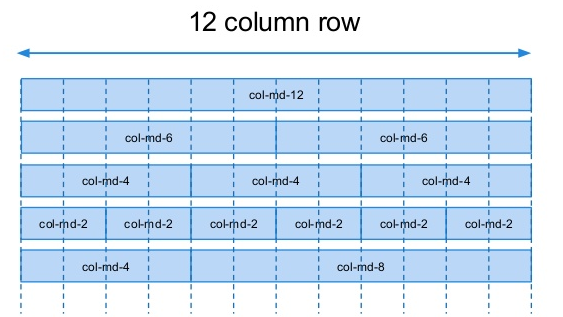
The page display can be divided into 2 or more columns by using the grid layout feature of bootstrap.css, a widely used stylesheet included in the browser static pages. Bootstrap works on a 12-column system: as long as the number of column segments adds up to 12, you are golden.
The example below demonstrates how to set up a page section (div class="row") containing 3 columns of equal width (div class="col-md-4"). The numerical value of n in col-md-n determines the column width, and the ns within a row class must add up to 12. To implement the 3 equal columns, the total number of bootstrap columns (12) is divided by 3, which equals 4; therefore, class="col-md-4" is used for each column.
To implement a similar layout in which the first column is twice the width of the other 2, you could set "col-md-6" for the first column, and then "col-md-3" for the other two. This would split the page in half, with the left half displaying the contents of the first column, and the right half divided into 2 smaller columns. See a picture here or search the web for a good tutorial, like this one for more.
<div class="row">
  <!-- 1st column -->
  <div class="col-md-4">
    <h2>First</h2>
    <p>
    Contents of column 1</p>
  </div>

  <!-- 2nd column -->
  <div class="col-md-4">
    <h2>Second</h2>
    <p>
    Contents of column 2</p>
  </div> <!-- end column -->

  <!-- 3rd column -->
  <div class="col-md-4">
    <h2>Third</h2>
    <p>
    Contents of column3</p>
  </div> <!-- end column -->
</div>   <!-- end row -->
Files destined for the round robin and mirrors (public documents)
- These files should only be edited in your checkout of the git kent source tree at $HOME/kent/src/hg/htdocs/
- After a make, copies will be located in /usr/local/apache/htdocs/ (this is the path used in push requests)
- Make Procedure:
- Note: If your page is new and has a server side include (SSI) which looks something like this:
- <!--#include virtual="../../inc/topbar.html"-->
- make sure the execute bit is turned on for the file which can be done by doing this:
- chmod +x fileName
- This will need to be done before you do any makes or you will have to delete the rsync'd file, change the permissions, check them in, and redo the make.
- (optional) to view your changes on in your own sandbox, on hgwdev type: make user from $HOME/kent/src/hg/htdocs/.
Have you created a new file and want to see it in your own sandbox before committing it to the tree? Type make user FIND=find. (Note that this will copy any files present in your $HOME/kent/src/hg/htdocs/ directory to your /usr/local/apache/htdocs-user/ directory, even if they are not checked in to git. To see what untracked files are in this directory, use our gitu utility.) - To view your changes on http://hgwdev.cse.ucsc.edu/, on hgwdev type: make alpha from $HOME/kent/src/hg/htdocs/
- If your changes look good, check them in.
- To see changes on http://hgwbeta.cse.ucsc.edu/ (and to get them in the right place for a push request), on hgwdev type: make beta from $HOME/kent/src/hg/htdocs/
- If your changes are ready to go to the RR, then ask the cluster admins for a push of the file(s) in /usr/local/apache/htdocs/ from hgwbeta -> RR.
Large files destined for the round robin or linked to from Genomewiki (i.e. files too large to be checked into the main htdocs repository)
- The types of files that are located here are help file examples, tutorial examples, or files that are linked to from Genomewiki.
- After a make, files are located in /usr/local/apache/htdocs (this is the path used in push requests).
- To edit these files, check out the htdocsExtras repository in your home directory:
git clone yourlogin@hgwdev.cse.ucsc.edu:/data/git/htdocsExtras.git/ htdocsExtras
- Make Procedure:
- (optional) to view your changes on in your own sandbox, on hgwdev type: make from $HOME/htdocsExtras/.
- To view your changes on http://hgwdev.cse.ucsc.edu/, on hgwdev type make alpha from $HOME/htdocsExtras/.
- If your changes look good, check them in.
- To see your changes on http://hgwbeta.cse.ucsc.edu/ (and to stage them for release to the RR), on hgwbeta type make beta in your $HOME/htdocsExtras/ directory.
- If your changes are ready to go to the RR, request a push of the file(s) in /usr/local/apache/htdocs from hgwbeta -> RR.
pdf files: example of htdocsExtras files
- Typically pdf files belong in the separate htdocsExtras repository.
- If you need to edit a pdf that has already been checked in:
- pdfs are basically compressed binary files, so git will not be tracking lines of text changed.
- Replace the file in the working dir with the new copy, git add, and git commit as usual. (No need to git rm it beforehand.)
- Git will retain the history of who has modified it and when, even if it will not show useful diffs like a text file would.
Files destined for hgdownload
- These files are located in /usr/local/apache/htdocs-hgdownload/ (this is the path used in push requests).
- To view them: http://hgdownload-test.cse.ucsc.edu/downloads.html.
- Most of the data files here are NOT kept in a git repository.
- To edit non-data static docs (such as downloads.html), checkout the hgdownload repository in your home directory:
git clone yourlogin@hgwdev.cse.ucsc.edu:/data/git/hgdownload.git/ hgdownload
- Make Procedure:
- To view your changes on hgdownload-test (http://hgdownload-test.cse.ucsc.edu/) on type make alpha on hgwdev in $HOME/hgdownload
- If the changes look good, check them in.
- When ready to move to hgdownload, request a push from /usr/local/apache/htdocs-hgdownload/ on hgwdev -> /usr/local/apache/htdocs/ on hgdownload. (These files should not appear at all on hgwbeta.)
Files for internal use
- These files are located in /usr/local/apache/htdocs-genecats/.
- To edit these files, check out the repository in your home directory:
git clone yourlogin@hgwdev.cse.ucsc.edu:/data/git/genecats.git/ genecats
- To view these files: http://genecats.cse.ucsc.edu/$directory.
- Make Procedure:
- To view your changes on http://genecats.cse.ucsc.edu/, type make install on hgwdev in $HOME/genecats.
- If your changes look good, check them in.
Editing sla.html
- http://genecats.cse.ucsc.edu/qa/sla.html
- The file is located in ~/genecats/qa
- Full path: /cluster/home/$USER/genecats/qa
- Do a git pull from genecats
- Edit the file and save
- Type "make" from the ~/genecats directory and review your changes at http://genecats.cse.ucsc.edu/qa/sla.html. If good,
- Add, commit, push your changes
Gateway description.html pages
- These pages live at /gbdb/$db/html/description.html and get pushed to hgnfs1 directly from hgwdev
- They will not show up on beta (which uses hgnfs1) until pushed to hgnfs1 (which will also populate them on the RR), and so there is no "make beta" to populate these changes on beta (or beta-public).
- To populate changes on hgwdev you do a make or a make alpha in kent/src/hg/makeDb/trackDb/ on hgwdev. See Static_content_for_new_assemblies for more info.
Unique markdown format files
- Few pages, such as goldenPath/help/gbic.html also live as markdown text in ~kent/src/product/installer/README.md
- A process can exist where the markdown file README.md can be used to generate the gbic.html page
- The makefile at ~kent/src/product/installer/ uses something called pandoc to convert the README.md file into html and plunks it down into /goldenpath/help/gbic.html
- After that make, the changes will be tracked in git to gbic.html and can be committed and regular htdocs make user/alpha/beta will populate the pages, and regular push requests from beta are needed. See #17705 (and less ~kent/src/product/installer/makefile) for more conversation on the topic.
- This process has the advantage of engineers only having to edit one README.md file, which will in turn generate the related help page /help/gbic.html, so that ultimately documentation should not diverge.
Procedures for deleting a static doc
This procedure is only for obsolete pages that management has asked QA to remove.
1. Remove the files in the kent repository
- git rm filename (this also stages the file, no need to "git add")
- git status (see your file in green - staged)
- git commit -m
- git pull
- git push
- When others do a git pull, they will no longer see the removed files.
- To remove a dir, do git rm dirName/* which will remove all the files, and thus also removes the dir, as git sees that it is empty.
- You are not really removing the files, you are archiving them in git, they can be retrieved - write a helpful commit message.
- This removes files from kent, but not from /usr/local/apache/htdocs - you'll still see your pages on the site.
You can use one of your commits to see the difference in htdoc files between locations, like this:
 ★  ~/kent/src/hg/htdocs
diff -arq . /usr/local/apache/htdocs
And you can show the files removed in that commit:
git show --stat c048bc2
2. You will now need to manually remove the files in several places that are not git repos.
- For files, use "rm fileName".
- For directories, "force remove" the directory and all contents:
rm -rf exampleDir
QA CAN REMOVE FILES FROM THESE PLACES:
- To remove the files from http://hgwdev.soe.ucsc.edu/ and http://genome-test.soe.ucsc.edu/ do a file removal in dev's /usr/local/apache/htdocs
- To remove the files from http://hgwdev-beta.soe.ucsc.edu/, do the same file removal in dev's /usr/local/apache/htdocs-beta
- To remove the files from http://hgwbeta.soe.ucsc.edu/, ssh into qateambeta and do the same file removal from beta's /usr/local/apache/htdocs
3. Ask pushers to remove remaining files:
ASK PUSHERS TO REMOVE FILES FROM THESE PLACES:
- http://genome.ucsc.edu/ (RR)
- http://genome-euro.ucsc.edu/ (Euro)
- http://genome-asia.ucsc.edu/ (Asia)
- http://genome-preview.soe.ucsc.edu/ (Preview)
- Note: For genome-preview, QA can ssh qateam@hgwalpha.soe.ucsc.edu to see the files in preview's /usr/local/apache/htdocs, but QA does not have permissions to add/remove files.
- Since new mirror sites are generally rsync-ing RR's htdocs, new sites won't get the removed files. Older mirrors will have them until they re sync.
- Finally, search the site for references to these pages (e.g., test or links to the pages) and update them (as we would now get a 404).